


With Easter just around the corner, check out this handy how-to of Easter inspired nail art. All you need is a few house hold items and your favourite nail polishes, and you’re ready to go! With all of these designs, I suggest using a clear base coat before you put on your background colour, and seal the designs with a clear top coat afterwards (make sure your nails are fully dry first, or you might smudge your design!) Where I’ve mentioned using a marbling tool, the same effect can be achieved with a cocktail stick.
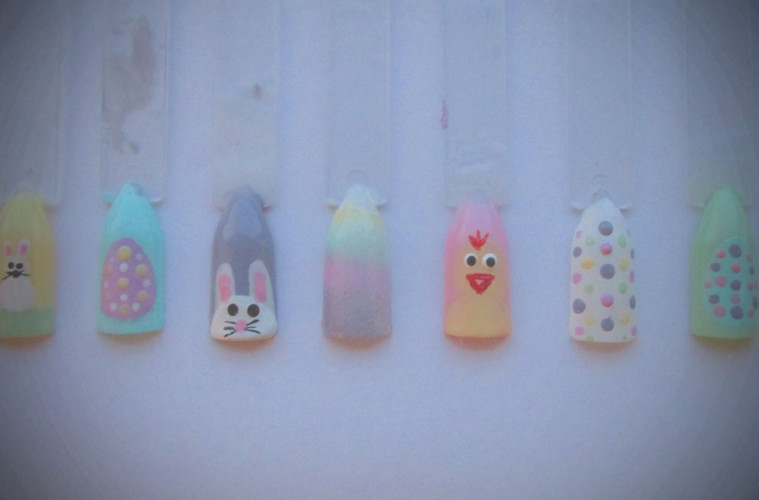
Peeping Bunny Design
1, Paint a contrasting background for your design (I chose lilac as my bunny was going to be white).
2, With the chosen colour for your bunny, paint a semi circle across the tip of your nail and fill it in.
3, Paint two lines with rounded edges from the top of the semi circle to make his ears.

4, Paint two smaller pink lines inside the ears for added detail.
5, With a marbling tool (or a cocktail stick) add two black dots for eyes and a pink dot for a nose.
6, Add whiskers by dipping the cocktail stick into the black polish and dragging them from the nose.
Easter Chick Design
1, Paint a contrasting background for your design (I chose light pink as my chick was going to be yellow).
2, Paint a yellow semi circle across the tip of your nail and fill it in.
3, At the top of the semi circle, paint a full circle to make his head.
4, Add two white dots with a cocktail stick for his eyes.
5, In orange, add a beak and hair detail.
6, Add black dots to the eyes with the cocktail stick.
Easter Egg Design
1, Paint a contrasting background for your design (I chose green as my egg was going to be blue).
2, Paint an oval egg shape in the colour of your choice.
3, With a cocktail stick, add dots in different colours.
Bunny On A Hill Design
1, Paint a contrasting background for your design (I chose yellow as my bunny was going to be white, and my grass green).
2, Paint a green line of grass at the tip of your nail. By slightly moving the brush up and down, you can get a rougher, more realistic shape.
3, Paint a white circle on the grass for the bunny’s body.
4, Add a second white circle on top of the other one for the bunny’s head.
5, With a marbling tool, or a thin brush, add two ears.
6, With a cocktail stick, add pink details to the inside of the ears.
7, Add eyes, a nose, and whiskers with a cocktail stick.
Easter Pastel Ombre
This design is a little bit different. You will need a make-up sponge (one you don’t need to use again, as the nail polish will stain it!) You can use any colours, but as I wanted my nail to be part of the Easter theme, I chose pastel colours in yellow, mint, light pink, and purple.
1, Paint the whole of your nail in the lightest colour.
2, On the sponge, draw a line of each colour next to each other (It doesn’t matter if they overlap).
3, Press the sponge over your nail.
4, Repeat until the colours are bold (I normally do this about 3 times in total).
5, When the polish is dry, seal with a clear top coat (This is important for this design as it smooths out the imprints from the sponge).
Easter Polka Dot Nails (this one is super simple, but effective!)
1, Paint a base coat (I chose white as I wanted to use the pastel colours for my polka dots).
2, With a cocktail stick or marbling tool, add coloured polka dots to the nail.
- Subscribe to The Student Pocket Guide for exclusive competitions, deals, discounts, tips and advice!
- Read The Student Pocket Guide.
